How To Whiten Teeth - EPIC Guide
- David Chen, DDS

- Aug 6, 2022
- 26 min read
Updated: Feb 6, 2024
The teeth whitening industry comes out with more and more ways to whiten your teeth each year but how to do it is different depending on the product. This guide will explain how to whiten your teeth with every product known to man. We will also give our opinion on how effective they are, the costs, the pros and the cons for each of them.
All the ways on how to whiten your teeth:
How to whiten teeth with toothpaste
One of the most accessible and inexpensive way to whiten your teeth is with some toothpaste and a toothbrush. Just about every toothpaste on the market states that they can make your teeth whiter if you simply brush with it. It requires no additional effort since it is already a part of your oral hygiene routine.
This is how you use whitening toothpaste:
Rinse your mouth with water and spit it back out.
Wet your toothbrush by running it under water.
Apply toothpaste to your toothbrush.
Brush your teeth for a total of 2 minutes.
Rinse out your mouth to get rid of any residue.
Common brands with whitening toothpastes:
Colgate
Crest
Arm and Hammer
Sensodyne
Toms
How effective is toothpaste for whitening your teeth?
Whitening toothpaste will definitely make your teeth appear whiter after brushing with it. However, the mechanism that it whitens your teeth may not be what you would have expected.
Toothpaste will whiten your teeth but it is through mechanical removal of surface stains only.
What we mean by mechanical removal of surface stains is that it will get rid of food and plaque that may be covering the surface of your enamel. Basically, it will remove all extrinsic surface stains.
The mechanical removal of stains is NOT the same as what you would think of as "whitening your teeth" which involves oxidizing deeply embedded intrinsic stains. The oxidation of deeply embedded stains is what happens with a professional in-office whitening session at the dentist.
An analogy - What the whitening toothpaste does to your teeth is similar to if you had white marble counter tops but you have oreo cookie crumbles littered all over it. When you wipe it away with a sponge and some soap, you have technically "whitened" the marble counter tops. The same can be said for the toothpaste, you are literally cleaning any stains or colored food particles that may be on the surface of your enamel.
Therefore, toothpaste can whiten your teeth but not in the way that you think it does! It is due to this reason that the effectiveness of it is limited and also why most people seek out alternative ways on how to whiten teeth.
The cost of using toothpaste to whiten your teeth
You can find toothpaste at probably every store that you can think of. The best part about it is that it's incredibly inexpensive because you can find a 6 pack for less than $10 on amazon. In fact, if you buy them in bulk at one of the wholesalers like BJ's or Costco, it can be even cheaper.
Due to its ease of availability and low cost, price is definitely not a barrier to using it. Although there are more expensive toothpastes but they're typically marketed as more natural and premium. An example would be David's toothpaste, which costs $10 for one tube. That is literally six times more expensive than the regular Colgate toothpaste.
Nonetheless, even with that price premium, using toothpaste for teeth whitening is still significantly less expensive than an in-office session with your dentist.
What are the Pros and Cons?
There is no whitening product that is perfect and without any flaws and toothpaste is no exception.
These are the pros for using whitening toothpaste:
Inexpensive
Easily accessible
Already part of oral hygiene armamentarium
Easy to use
The cons:
Only removes extrinsic stains on the enamel.
If you have deeply embedded intrinsic stains, you're out of luck because it won't remove them.
Exceptions - Toothpastes that do more than mechanical stain removal
The reason toothpastes can only mechanically remove external stains is because they do not contain any actual whitening ingredients. There are only two substances on this planet that can "whiten" your teeth and they are hydrogen peroxide and carbamide peroxide.
Unfortunately the vast majority of whitening toothpastes do not contain either of those whitening ingredients. That is why they're relegated to only mechanically removing surface stains.
However, in recent years there were two toothpastes that came onto the market which DO contain whitening ingredients:

This trend marks a shift in the potential for toothpastes to actually whiten your teeth by chemically oxidizing the deeply embedded stains. That certainly does make these two toothpastes with whitening ingredient within them more effective than the rest of the toothpastes. You can read more about these two toothpastes here to find the best one.
However, you should still take into consideration that for whitening, you typically need to have the gel in contact with your teeth for 20-30 minutes for the higher concentration products. For a lower concentration product like toothpaste, you would require significantly more contact time if it is to be effective.
Now if you think about how long people typically brush their teeth, which is 2 minutes. That isn't quite enough time for the whitening gel to make any noticeable effect!
How to whiten teeth with mouthwash
Another inexpensive way to whiten your teeth is by using a whitening mouthwash. In addition to being easily accessible and purchasable at any local market, it also has a low barrier to entry. It is an undisputed fact that most households already have some type of mouthwash in their medicine cabinet.

Most people use a mouthwash as a part of their everyday oral hygiene routine, which includes brushing and flossing. They may not necessarily have a mouthwash that is meant for whitening but they certainly have a type of mouthwash. They can easily swap out their existing mouthwash for a whitening one.
How to use mouthwash to whiten your teeth:
Floss your teeth to remove all food in between.
Brush for at least 2 minutes so that plaque and food don't prevent the mouthwash from working.
Pour 15 mL of whitening mouthwash into a cup.
Swish the mouthwash around for 60 seconds.
Do not swallow. Spit out and do not eat or drink for 30 minutes.
How effective is mouthwash for whitening your teeth?
Regular mouthwash is not very effective for whitening your teeth because they can only remove surface stains like toothpaste. However, mouthwashes which are labeled as whitening can be effective in whitening your teeth. The reason is because they all contain hydrogen peroxide, which is an actual whitening ingredient.
Here are some common whitening mouthwashes that contain hydrogen peroxide:
ACT Whitening mouthwash
Listerine Healthy White
Crest 3D White Brilliance
Colgate Optic White mouthwash
Reach Whitening
Since these mouth rinses do indeed contain an actual whitening ingredient, they can be effective. Our only concern is that most people will rinse their mouth for about 60 seconds total, which isn't quite long enough for the whitening to make a noticeable difference.
In-office whitening will have the gel in contact with your teeth for about 20-30 minutes. The customized take home trays will have you wearing the gel while you sleep. All of these methods have your yellow teeth in contact with the whitening gel for a significantly longer period of time than you are rinsing your mouth.
Therefore, our opinion is that it may be helpful but you probably won't have any drastic results. You may want to employ additional methods if you want whiter teeth.
The cost of using a whitening mouthwash
Not just whitening mouthwashes but mouth rinses in general are inexpensive. They typically cost between $5-$10 so they are very affordable. There should be no qualms about using it nor any cost barrier to entry. If your teeth aren't as white as you like, there is no reason why you couldn't have a bottle of this rinse in your medicine cabinet.
The pros and cons
The Pros:
Inexpensive
Easily accessible
Most people already use mouthwash
Contains hydrogen peroxide
Easy to use
The Cons:
Effectiveness may be limited due to short rinsing time.
Can't swallow it
Our opinion is that you should still give the mouthwash a try to see if it can whiten your teeth. There is no harm and very little downside to trying since it doesn't cost very much. If it works then that's great and if it doesn't, you can always explore alternative options.
How to whiten teeth with chewing gum
Some people may not have been aware of it but there are chewing gum which were made to whiten your teeth. The label on the packaging specifically states that the gum is for whitening. As for how you use it, it is precisely what you imagined it to be, you chew it.
In case you wanted more specifics, here is how to use whitening chewing gum:
Remove whitening gum from packaging.
Place it in your mouth.
Chew the gum for 20 minutes.
Dispose of gum in trash.
How effective can whitening your teeth with gum be?
You may be wondering since you can swallow flavoring from the gum but not the gum itself, does it really contain any whitening material? It turns out that chewing gum can whiten your teeth but mostly via mechanical means. This means that they physically stick to food and plaque on your teeth and pull them off.
Here are the "whitening ingredients" within chewing gum:
Calprox®. This is a patented product which consist of baking soda. It is basically a form of calcium peroxide. The only whitening chewing gum which uses this patented product is Supersmile. The effects are similar to how baking soda works since it is made of the same ingredient.
Titanium dioxide. It may sound scary but is actually an abrasive material. It works by removing external surface stains via abrasion. Most toothpastes also contain this to help whiten teeth by removing surface stains only. You should read your toothpaste's label, you'll most likely find it there!
Sodium bicarbonate. The scientific name of baking soda is sodium bicarbonate, which means that you're chewing on baking soda. Not the most pleasant sounding but it is in a lot of toothpastes. The most common one would be the arm and hammer brand.
Research: If you wanted a study which proves that the gum can whiten your teeth... unfortunately there isn't one. However, there was one study which looked at gum but it found that chewing medicated nicotine gum had a greater whitening effect vs regular whitening gum.
Conclusion
Nonetheless, in our opinion we do have reservations for whether or not it is effective because the chewing gum works on the wrong surface. What we mean by that is when we want white teeth, we want to whiten the lip facing surface and NOT the chewing surface.
Since the chewing gum works via mechanical means, it would only affect the chewing surface. That leaves the surface we want whiten, untouched. Therefore it whitens the wrong surface!
The cost of whitening chewing gum
Chewing gum is incredibly inexpensive and widely accessible. They not only sell them at markets but also at your local delis and corner stores.
Supersmile professional whitening gum - $5.00 for 12 pieces
Trident White gum - $16.77 for 240 pieces
Orbit White gum - $13.84 for 160 pieces
Mentos Pure White gum - $15.00 for 150 pieces
Pros and cons of using chewing gum for teeth whitening
Pros:
Inexpensive
Can be purchased anywhere, in store and online
Great for freshening up your mouth after a meal
Cons:
May not whiten your teeth as you imagined.
Doesn't actually contain the traditional teeth whitening material.
How to whiten teeth with whitening pens
A fairly new teeth whitening option is using teeth whitening pens. These pens contain whitening material within them and you basically just brush the gel onto your teeth with the pen. Then you go to bed and let it get rid of the stains while you sleep. Convenience at its finest.
How to use a teeth whitening pen:
Brush and floss your teeth so that you have a clean surface to whiten.
Remove the cap from the pen.
If it is your first time using the product, you will need to click the back end of the pen up to 20 times or until the first drop of liquid appears.
Dry your teeth.
Use the pen to brush the material on your teeth. There should be enough material for about four teeth.
Click the back end of the pen to saturate the brush.
Brush it on the next four teeth.
Repeat steps 6-7 until you've covered all of your teeth.
Do not rinse and go straight to bed.
When you wake up, brush off the coating that has formed over your teeth.
Here is a video showing how to use the Colgate Optic White overnight whitening pen:
How effective are the pens for whitening your teeth?
Whitening pens can whiten your teeth because they contain hydrogen peroxide which is the same ingredient as the products your dentist uses. The hydrogen peroxide can chemically oxidize deeply embedded stains that are within your enamel. Once the stains are oxidized, your teeth will become less yellow and whiter in appearance.
The gel of every whitening pen lifts stains in the same way, even if the results vary from product to product. But that doesn’t mean whitening pens are all interchangeable—each product has its own unique set of attributes. Some whitening pens focus on their flavor formula—masking the taste of peroxide with different flavor profiles.
Other products enhance their results with usage of an LED light. Other whitening pen brands prioritize their ingredients, whether that’s using all natural products, or making their formulas work for people with allergies or dietary restrictions.
However, the effectiveness of these pens will always be inferior to any whitening products that use a tray as well as in-office methods. They are less effective because they don't have any sort of barrier that can protect the whitening gel from saliva. Your saliva contains a lot of enzymes that will break down fats in the food you eat as well as whitening gel.
Since the pen does not come with a barrier, that makes it inherently less effective than the whitening products that come with a tray. The tray helps to protect the gel from your saliva.
Although one perk to using the pens is that they are the most effective OTC whitener for in between the teeth.
The cost for teeth whitening pens
The whitening pens are relatively inexpensive when compared to the in office products or anything that your dentist has in stock. They do however cost more than the whitening toothpastes and mouthwashes. Nonetheless, they're still worth a try since they are more effective than simply brushing and rinsing your mouth.
Here are some common brands of teeth whitening pens and their price:
Colgate optic white - $34.99
Smile direct club - $17
Reach essentials - $7.25
Pharmacy branded whitening pens - $11.99
What are the pros and cons?
Pros:
Relatively inexpensive
Can purchase at most markets and pharmacies
Easy to use
Cons:
Does not come with a saliva barrier
More technique sensitive in that they do require the teeth to be dry
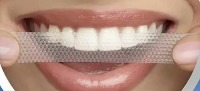
How to whiten teeth with whitening strips
Whitening strips are an over the counter product that you can use to whiten your teeth at home on your own time. The strips are manufactured with a flexible piece of plastic that has a coat of whitening gel on it. You simply remove the cover off of them and adapt them to your teeth. Wait a couple of minutes and your teeth should be whiter.
This is how you use teeth whitening strips:
Dry. Make sure you dry your teeth with a napkin or cotton pad.
Peel. Remove the strips from the packaging and the cover.
Apply. Adapt the strips over your upper AND bottom teeth.
Remove. Let the whitening strips sit on your teeth for 30 minutes before removing.
Smile. Enjoy your new pearly white smile.
Please be aware that not all white strips are to be left on for the same amount of time. Crest makes nine different variations of the whitening strips. Some are to be used for 30 minutes while others require 60 minutes. Read the label closely!
Here is a video on how to use it in case you prefer visual aid:
Are teeth whitening strips effective?
The whitening strips will whiten your teeth by oxidizing intrinsic stains that may be embedded within your enamel. They are able to do that because they do contain one of the whitening ingredients. Therefore, they're definitively more effective than simple whitening toothpaste.
One of the main advantages to using whitening strips is that the flexible strips themselves help protect the gel from saliva. Your saliva contains a lot of enzymes that will break down and degrade the whitening material. The simple addition of a flexible strip to hold the material against your teeth will prolong the amount of time that your teeth actually get whitened.
All of the other whitening methods which we've described so far: toothpaste, mouthwash, and the pen do not have a mechanism to ward off saliva. Therefore, they are all less effective than whitening strips.
What's the cost of whitening strips?
The teeth whitening strips are still relatively affordable, ranging from as low as $20 to as high as $50. Certainly not as inexpensive as toothpaste or mouthwash but still much more affordable than bleaching your teeth at the dentist.
Here are some common brands and their cost:
Crest 3D Whitestrips - $45.99
Equate Timeless White Whitening strips - $20.00
CVS Classic Whitening strips starter kit - $14.99
Snow The Magic Strips - $49.00
SmileDirectClub Whitening strips - $24.00
Pros and cons of using strips
Pros:
Available over the counter
Contains whitening ingredient hydrogen peroxide
Flexible strips protects gel against saliva
Easy to use
Great for testing if your teeth can handle the whitening sensitivity
Cons:
Not customized for your teeth so contours aren't perfect.
Uneven whitening due to non-customized.
Can potentially whiten your gums
We would like to emphasize that one of the downsides to using the strips when compared to a take home whitening tray from your dentist is that they aren't customized to your mouth. Since the strips are over the counter, they are in a generic rectangular shape. The custom trays that your dentist makes for you follow the contours of your teeth while these do not.
The non-customized nature of the flexible strips is that they produce an uneven whitening and they may also miss certain nooks and crannies on your teeth. They may also potentially whiten your gum as well if the material spills out since it doesn't follow the contour of your gums.
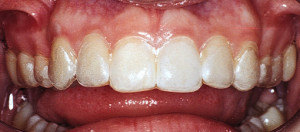
The two photos right above demonstrate the difference in the shape of the strips vs custom trays. The custom trays follow the contours of your teeth and thus give a more even whitening.
Nonetheless, we still recommend that you give the whitening strips a try first prior to using any products directly from your dentist. The reason is to see if you can handle teeth sensitivity, which is a side effect of whitening. The strips are not inherently bad for you but sensitivity is a known side effect. If you can't handle the strips, there will be no way you can handle an in office whitening session.
If you still want to proceed despite our recommendation, that is up to you. However, if you have a history of sensitivity even without trying to brighten your teeth, you really should test the waters with the strips first.
How to whiten teeth with ready to wear whitening trays
Ready to wear whitening trays are similar to the strips but they're still less customized than trays that your dentist can make for you. They do offer a better fit and conform to the shape of your teeth better than the flexible strips. In other words, they're supposed to be a better delivery method for pre-filled whitening gel.
This is how you should use the ready to wear whitening trays:
Clean your teeth by brushing and flossing first.
Dry your teeth with a cotton pad or tissue.
Remove product from packaging.
Place and position the upper tray on the top teeth.
Bite firmly into the tray and suck on it for 2 seconds.
Remove the colored outer layer of the tray.
Repeat steps 4-6 for the bottom teeth.
Wear the trays for 30-60 minutes or as instructed on the box.
Remove trays and rinse out your mouth.
This is a video by Opalescence about how to use their specific ready to wear trays:
How effective are the ready to wear whitening trays?
The ready to wear pre-filled whitening trays do contain real whitening gel so they can change the color of your teeth. It will be more than just removing surface stains because they can also oxidize intrinsic stains as well.
Since the gels are delivered in a tray, that will help protect the whitening material from the enzymes in your saliva. This means that this method will be more effective than other techniques which don't have a type of barrier against saliva.
In terms of effectiveness, we will say that it is greater than the whitening strips, pen, mouthwash, and the toothpaste. It is most likely less effective than custom trays from your dentist and all in-office whitening sessions.
How much do these pre-filled ready to wear trays cost?
These ready to wear trays can be purchased online and over the counter. The brand name ones do cost significantly more than the branded drug store ones.
Opalesence Go - $69.99
Auraglow Custom teeth whitening kit - $45.00
Harmon face values whitening tray - $23.49
Burst teeth whitening - $79.99
What are the pros and cons?
The pros:
Over the counter and do not require a visit to the dentist
Easy to use
Less expensive than options from your dentist
The trays act as a saliva barrier to make your whitening gel more effective
The cons:
More expensive than the other at home whitening options.
May not be effective enough to give you the results you want. If it doesn't work for you, you would need to see a dentist.
How to whiten teeth with at home products that use a light
In the past few years, there has been a lot of at home whitening products that include a light. This light allegedly activates and accelerates the whitening of your teeth. The idea or inspiration came from ZOOM whitening, which is a professional in-office product by your dentist that uses a light.
Due to brand recognition and the use of a light in ZOOM, all of these at home products started offering their own version of an at home light to use. In addition to the light, the gel delivery method is either with flexible strips or a ready to wear tray.
These are the instructions on how to whiten your teeth at home with a light by Crest. It is actually the same exact product as the flexible strips except for the fact that you use a light in addition to using them.
Peel the strips from the packaging and wrapper.
Apply the strips over your top and bottom teeth.
Boost - Use the Crest LED accelerator light for 5 minutes to speed up and enhance the whitening effects.
Remove the strips after 30 minutes on the teeth.
Here is the video by Crest on how to use the strips with the light:
How effective is the at home whitening using the light?
Since this whitening method is similar to the whitening strips aside from the fact that it also incorporates the light. It should theoretically be more effective than just the strips alone. They both should whiten your teeth since they do utilize actual whitening gel.
Now just for clarity, there has been mixed studies regarding whether or not the light increases the effectiveness of the bleaching gel.
Research:
This particular study stated that there was no significant difference in the change in tooth shade between the group using the light and the group without.
Another study did find that using the light helped to improve the whitening effect vs without the light.
A third study found that the use of a light in conjunction with whitening did significantly improve the color. However, the effects were short lasting because they rebounded within 7 days.
A fourth study reported that there was no different in tooth shade after a two week period of using the light and not using the light.
The results varied from study to study. There was no definitive answer to whether or not the light improved the whitening of teeth. According to KoR whitening, they allege that the light doesn't actually whiten your teeth. Instead, the light will dry out your teeth and thus gives it a whiter appearance. However, after a few days the teeth will re-hydrate and the original color would return.
How much does this type of treatment cost?
The cost for either the strips with light or the trays with light varies greatly depending on the brand. They're still less expensive than options from the dentist though.
Crest 3D whitestrips + LED light - $69.99
iLUMI at home teeth whitening kit - $49.95
MagicBrite Complete teeth whitening kit - $12.99
SNOW teeth whitening kit with LED light - $149.95
What are the pros and cons to using a light at home?
The biggest perks for using this method is that you can do it at home and it is less expensive than an in-office session.
The pros:
Relatively inexpensive
Can do it on your own time
Comes with a tray that can protect against saliva
Light may increase whitening effectiveness
The cons:
The light may or may not be beneficial
Does cost a bit more than the systems without a light.
How to whiten teeth with custom trays from your dentist
Whitening your teeth with custom trays by your dentist is the least expensive professional option. The treatment does require a visit to the dentist and also waiting to have the trays made.
Your dentist needs to first take molds or impressions of your teeth to make the trays. Once the trays are ready then you come back to pick it up along with the whitening gel and instructions. Once you have all of that, you're ready to start.
This is how to whiten your teeth with custom trays by your dentist:
Brush and floss your teeth prior to starting.
Apply the desensitizer if it comes with one.
Fill the whitening trays with the bleaching material on the OUTSIDE surfaces only. Do not put the gel on the tongue facing surfaces of your tray.
Place the upper and lower trays both in your mouth.
Press the trays firmly against your teeth.
Take a cotton tip and wipe away any excess material that may be on the gums. This will prevent the gums from turning white.
Go to sleep.
When you wake up, remove the trays and rinse it with cool water.
Allow the trays to air dry in the case with the cover open so it doesn't attract mold.
Repeat steps 1-9 depending on your take home protocol.
This is a video with instructions for the KoR Whitening take home kit:
How effective are custom whitening trays?
Getting custom whitening trays from your dentist means that it is a professional product. It is not an over the counter product since you are unable to purchase it without a prescription.
Since it is of professional quality, it is more effective than ALL do it yourself options.
Customized trays - they are made specifically for you and conform to every nook and cranny of your tooth. This means that the whitening gel will cover the surfaces of all of your teeth evenly, which produces a more even whitening. The trays will also protect the gel against enzymes in saliva which try to inactivate the gel. This further increases the efficacy of the treatment. It also makes it less likely for your gums to be bleached because you can easily wipe off any excess since the trays follow the contours of your gums.
Higher concentration - since the product is provided by your dentist, the whitening concentration is usually higher than what you can attain over the counter. A more potent bleaching gel will increases the odds of your teeth turning snow white.
What is the cost of this treatment?
Since customized trays are made by your dentist, the cost could vary greatly depending on where you live. The reason has to do with the cost of living in your neighborhood. Just as an idea, the custom whitening trays could cost anywhere from $200-$400. However, we wouldn't be surprised if it costs more than that if you live in a very high cost of living area.
The price will be significantly impacted by the cost of labor and your dentist's overall overhead for the office.
The pros and cons
This is the first treatment on the list that is a professional product. Expect some plus and some minuses with this treatment. One notable side effect would be teeth sensitivity after whitening.
Pros:
Professional product
Whitening trays are customized to your mouth, which ensures efficacy
Whitening gel are typically of higher concentration
Cons:
May be more sensitive than the at home products due to higher concentration of bleaching gel.
More expensive than at home options.
Requires at least two trips to the dentist.
How to professionally whiten teeth in the office with a whitening system that uses a light
The most well known whitening system that utilizes a light for in-office whitening is ZOOM. They're so prominent that most patients automatically ask about the light whenever they inquire about teeth whitening.
Here is how to whiten your teeth in office with the light:
Place light blocking orange goggles on patient.
Insert cheek retractors to lift soft tissue away from teeth.
Place white bib into the retractors for protection.
Apply barrier to the gums to protect it against the whitening gel, which may bleach the gums white.
Light cure the barrier gel to harden it.
Apply ZOOM whitening gel to all of the teeth except the second molars.
Place the ZOOM light onto the teeth.
Let it run for 15 minutes.
Remove the light and suction off the whitening gel.
Repeat steps 6-9 two more times.
Remove the gum barrier.
Give patient post operative instructions and they're done!
Basically for ZOOM, it is three rounds of 15 minute minutes with the light on the teeth. The teeth will get sensitive afterwards. We've had some people who had to stop the treatment after the second round. Not everyone can make it through to the end.
This is the ZOOM training video, which is an in-office system that utilizes a light for whitening teeth. It demonstrates all of the steps that will occur so that you know what to expect.
Is the in-office whitening with the light effective?
The short answer is yes, it is incredibly effective. In fact, it should whiten your teeth by at least one shade if not a couple shades lighter. This is the go to whitening system to use when the at home methods fail.
Here is a before and after result from ZOOM:

The teeth look about a couple of shades whiter. Of course results will vary from person to person so don't expect yours to be as drastic. What we have noticed is that most people should get at least one shade lighter.
The cost for in-office whitening with the light
The cost for ZOOM in-office whitening with the light is about $300-600. However, a lot of offices report the average being around $500 total. The price may vary depending on the cost of living in your area. In a higher cost of living neighborhood, it may be on the higher end. The vice versa also holds true, less expensive in a less expensive neighborhood.
Pros and cons of whitening in the office with the light
Pros:
One of the most effective ways to whiten your teeth
May give you one of the most drastic whitening effects
Cons:
Much more expensive than do it yourself options
May result in severe teeth sensitivity. Some patients don't make it through all of the whitening sessions.
Possible color rebound after 1-2 weeks due to the usage of the light.
Needs to be done at the dentist's office
How to whiten your teeth in office using a system without a light
ZOOM isn't the only in-office teeth whitening product because there are many that don't use a light. One of the most popular ones is KoR Whitening, which our long island city dental office uses. The process is very similar in that they use cheek retractors, gum barriers, and whitening gel. The main difference is that the whitening gel does not require light activation.
Here is how to use an in-office teeth whitening system like KoR:
Insert cotton rolls and cheek retractors.
Dry the teeth with air.
Apply KoR desensitizer to all of the teeth to be whitened.
Thoroughly dry teeth again with air.
Apply the paint-on gum barrier gel.
Light cure to harden and set the barrier gel.
Apply the whitening gel on all of the teeth.
Let the bleaching material stay on the teeth for a total of 20 minutes.
Suction off the whitening gel but do not rinse the teeth with water.
Repeat steps 7-9 two more times for a total of 3x 20 minute sessions.
Remove the gum barrier gel and the cheek retractors.
Rinse the mouth out really well with water.
Dry the teeth.
Reapply KoR desensitizer to all of the teeth.
Rinse out one last time and you are now done!
Here are some photos showing some of the steps in the process:
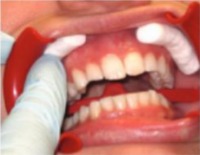

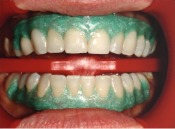

A video of the procedure:
Just to reiterate, KoR in-office whitening is three sessions of 20 minutes each back to back. ZOOM on the other hand is three sessions of 15 minutes back to back. It is not necessarily that more time means more effective. We just want to point out that protocols vary depending on which system you use.
How effective is in-office teeth whitening like KoR?
In office whitening with your dentist will be the most effective form of teeth whitening that you can get. All of these systems will whiten your teeth more so than every at home method that is available.
They all have much higher concentrations of whitening gel than what you can get over the counter. Consequently, they may also make your teeth significantly more sensitive than the DIY options.
Studies have shown that there isn't really a difference in whitening efficacy in regards to treatment with a light and one without. That means you can really go with any system or brand that your dentist uses. However, if you found that one system did not work for you then perhaps you may want to seek out a different one.
Here are some before and after results of KoR whitening:

The results from this particular whitening system certainly looks very impressive. Some of these teeth brightened by at least a couple of shades. That is in comparison to the at home methods which usually only give about one shade whiter.
What is the cost of in-office whitening without a light?
The cost for these in-office whitening systems without a light are comparable to the ones with a light. Although these may be slightly less expensive than the light because that is one less product to purchase for your dentist. That translates to lower overhead and savings passed onto you, the patient.
On average the price will range from $300 to $600 for an in-office session with your dentist. The variation in cost has everything to do with the cost of living in your area. Higher cost of living will translate to higher cost for this cosmetic procedure.
Pros and Cons of using this teeth whitening system
Pros:
Higher concentration of whitening product so it is more effective
Your dentist does everything for you so you don't need to learn any of the instructions
Cons:
More expensive than do it yourself options
Needs to be done at a dental office
May result in a lot more teeth sensivity after treatment
How to whiten your teeth at home naturally
Not everyone wants to use a whitening product per say and they wish to whiten their teeth naturally at home. Most of these methods involve home remedies such as natural substances or food.
Oil pulling
Baking soda
Strawberries
Pineapples
How to whiten your teeth by oil pulling:
Measure out one tablespoon of your choice of oil. Coconut oil is the most popular.
Transfer oil into your mouth.
Swish it around your mouth for 15-20 minutes total.
Do not swallow it and spit it back out.
Rinse your mouth out thoroughly with water.
How to whiten your teeth with baking soda:
Measure out one teaspoon of baking soda into a small bowl.
Mix a few drops of water to bowl.
Stir until mixture becomes a paste-like consistency.
Apply mixture to toothbrush and brush it on all of your teeth.
Leave the paste on your teeth for 2-3 minutes and let it whiten them.
Rinse your mouth out with water.
There are more ways to use baking soda, you can check it out here:
Crush a couple of strawberries with a fork.
Mix a teaspoon of baking soda into strawberries.
Apply the mixture to your teeth with a soft toothbrush.
Leave the strawberry mixture on your teeth for 5 minutes.
Now brush your teeth with regular toothpaste to get rid of any residues.
Rinse your mouth out with with water thoroughly.
How to whiten your teeth with pineapples:
Cut up some pineapples.
Eat as many pieces as you can.
Are natural home remedies effective in whitening your teeth?
In our opinion, these home remedies are not very effective at all since none of them contain any whitening ingredients. The only two substances that can whiten your teeth are hydrogen peroxide and carbamide peroxide. Home remedies do not contain either of them.
In fact we would go as far as to say that some of the methods are potentially harmful. Strawberries and pineapples are particularly acidic and rubbing acid on your teeth may cause enamel erosion. If you erode your enamel, you will reveal the yellow layer of dentin underneath. That is counter productive to whitening teeth.
However the baking soda should be safe for your teeth since it is not acidic. It is actually found in a lot of toothpastes such as the Arm & Hammer brand. Although just so that we are clear, it will whiten your teeth but only via mechanical abrasion and not by chemical oxidation.
The cost of natural home remedies for whitening
Since natural home remedies for teeth whitening are non-pharmaceutical products, they are often very inexpensive. Their prices are what you would find at your local supermarket.
Coconut oil - $23.58 for 16 oz
Baking soda - $11.94 for 72 oz
Strawberries - $3-5 for one box
Pineapples - $3-5 for one fruit
Closing Thoughts
There is a plethora of ways to whiten your teeth. More and more methods get invented with each year. Feel free to give them all a try, you should be able to find one that fits your budget. You can start off with the less expensive options since they have a lower barrier to entry. If those don't work then you can move on to the more professional products.
If the professional products don't work then you may be out of options whitening wise. Your only alternative would be to get dental veneers but that would be an irreversible procedure.
Last but not least, don't forget that if you simply prevent your teeth from becoming stained you wouldn't even need to whiten them.
Brush and floss twice a day to remove all staining foods and plaque.
Avoid staining foods like coffee, red wine, and tea.
Regular dental check ups and cleanings every 6 months
If you abide by the above three rules, you should be able to prevent or at the very least slow down the rate of your teeth becoming yellow. Regular teeth cleanings will help remove a lot of these stain build ups and make your teeth appear whiter.


