How To Whiten In Between Your Teeth
- David Chen, DDS

- Nov 8, 2023
- 4 min read
You've been whitening your teeth at home with the strips and the front surfaces of the teeth seem to be getting whiter. However the pesky spaces in between the teeth where you floss don't look like they're getting any whiter.

Are you curious if there is something that you're missing or something that could be doing to get the in between areas whiter? Well, of course there is something extra that you could do to improve your cosmetic results!
How to whiten between teeth effectively
If you want to maximize the whitening in between your teeth you should follow this protocol closely. It is meant to place an emphasis on bleaching the interproximal areas of where you floss through.
How to do it effectively:
Floss.
Brush with a peroxide-based whitening toothpaste for 2 minutes.
Spit out.
Rinse with a baking soda mouthwash.
Apply whitening pen on surfaces of all your enamel but place extra gel in between your teeth.
Flossing
It is important to floss all of your teeth prior to starting the protocol because you want to remove all of the food in between your teeth. If there is residual food in the crevices, it will prevent the whitening gel from whitening in between your teeth.

Does that make sense? You need a clean surface to work on so it is crucial to floss prior to starting. Imagine if there was peanut butter that was stuck, if you applied the whitening gel it may make the food turn white but not your teeth.
There is floss that is specifically meant for whitening but they are a bit more difficult to find. They're not as widely available as standard floss. They also seem to have a price premium as well.
Peroxide based toothpaste
Piggybacking on the flossing, you should brush your teeth right afterwards as well. Food doesn't just get stuck in between because you can have it on top and on the sides of your teeth. You should brush for a full two minutes to make sure everything is squeaky clean.
While you're at it, you might as well brush with a whitening toothpaste that works. What we mean by that is by using one that has hydrogen peroxide in it. The non-peroxide products only remove extrinsic stains via mechanical abrasion. However if you add peroxide to the ingredients, it will gain the ability to oxidize intrinsic stains, the ones deeply embedded into the tooth.

If you want your teeth to be whiter in between, you should definitely brush a peroxide-based toothpaste. If you want recommendations you should check out our guide on the best whitening toothpaste.
Baking soda mouthwash
After brushing and flossing, you should use a mouthwash to finish it off. Yes, we are asking you to use a baking soda mouthwash and not a whitening one. We are aware that a whitening mouthwash has peroxide in it but it is acidic and that will be counterproductive to our whitening gel that we'll use afterwards.

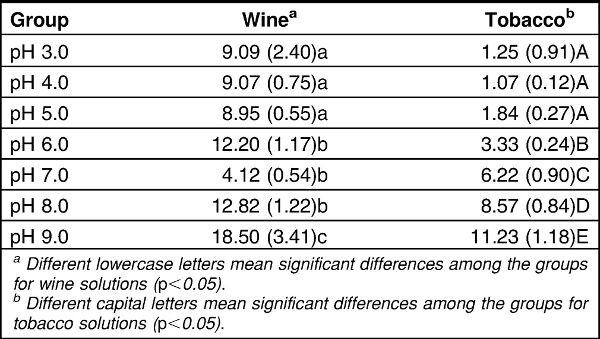
Studies have shown that hydrogen peroxide works more effectively in an alkaline environment and not an acidic one. As you increase the pH of the solution, the peroxide is able to remove more of the tooth stains. Here is a chart showing how more wine and tobacco stains were removed as you increased alkalinity.
So if you use an acidic mouthwash right before you put on whitening gel, it will actually make the whitening less effective. However if you switch to an acid neutralizing mouthwash, it can make it more effective.
Baking soda is known to be great at neutralizing acid and bringing the pH of the mouth back up to normal levels. It is the reason why the ACOG recommends using it after morning sickness induced vomiting. All of that stomach acid can potentially erode your enamel but rinsing with baking soda can minimize that risk.
The purpose of this rinse is to neutralize all acids and raise the pH of your mouth before you put on the whitening gel, which makes the whitening process more effective.
It will also help protect your teeth because if you place the whitening gel on your teeth in an acidic environment, it encourages enamel demineralization. The demineralization gets minimized while it is in an alkaline environment.
Whitening pen
The best way to whiten in between your teeth at home would be using a whitening pen. The advantage of using the pen is that you can directly paint the whitening material into the in between areas.

That is opposed to using whitening strips which sometimes aren't able to adapt to the in between areas. You'll find this to be especially true if you have a lot of teeth crowding.
The crowding makes it extremely difficult for the strips to adapt to the contours of all of your teeth. Those who've had previous orthodontic treatment will have an advantage over those who have crooked teeth.

Just to be clear, the whitening pen is meant to be used as an overnight whitening product. That means after you dry your teeth and paint it all on, you should hop into bed. It will whiten while you're sleeping but isn't that good for you? You don't have to do anything to monitor it because when you wake it up, it'll be done.
All you have to do is brush your teeth normally to get rid of the residual film that may be left on your teeth.
Takeaway
It is possible to whiten in between your teeth, you just need to utilize the correct methods. Most people who are doing it at home with OTC products are most likely using the whitening strips which aren't the best option, especially if you have crowded teeth.
With crowded teeth, you may have noticed that the strips don't really adhere to the edges, crevices, and the in between parts of your teeth. That means those areas won't whiten as well as the front facing flat parts.
You can bypass this by using the whitening pen which you can directly apply the gel to the in between areas. It doesn't get any easier than that. Nonetheless, you should follow our protocol in order to maximize the efficacy of the pen.
Last but not least, if you're really having trouble you can try professional teeth whitening with your dentist such as customized whitening trays or in-office sessions.


